As of 2016-01-24, the CCVM project has been fully decommissioned.
This page is about using CCVM as a CMU student. For Computer Club members, see Projects/ccvms/Internal_Use. For information about the OpenStack infastructure, including maintenance and deployment information, see Projects/ccvms/Openstack
CCVM Project |
|
|
|
Type |
Contributed |
Platform |
|
Language |
Python |
Status |
Release Testing |
Launch Status |
Q1 2015 |
Contact |
operations |
Owner |
sbaugh |
|
cpreseau |
|
ssosothi |
Website |
|
The CCVM project aims to provide easy-to-obtain virtual machines to members of the CMU community. It utilizes the OpenStack framework to allow users to start their own instance, access the console, re-install and boot their system remotely through a web interface. The interface is available to everyone in the community authenticating as a CCVM OpenStack user.
Currently the CCVMs project uses running 4 hosts, with 3 hosts dedicated as Compute Nodes. Each of the Compute node is powered by 8 Core Intel(R) Xeon(R) CPU X5470 @ 3.33GHz with 6144 KB cache, and 32GB 667MHz DDR2 FBDIMM Ram.
Organizations can contact operations@club.cc.cmu.edu to request an organization account with a higher instance and performance quota. We make no guarantee for the recovery of data stored on the instances, please periodically backup your instances to a safe location.
If you have any problems, please talk to a member of Computer Club! There will usually be people who can help in IRC
Contents
How to use CCVM web interface
OpenStack is fairly intuitive, but web UI, CLI, and API documentation can be found at: http://docs.openstack.org/user-guide/
You can use CCVM instance for anything, as long as you don't violate the CMU computing policy
Guide to making a VM for absolute beginners
Here is a step by step guide on how to launch an instance:
Goto the Instance page from the sidebar link
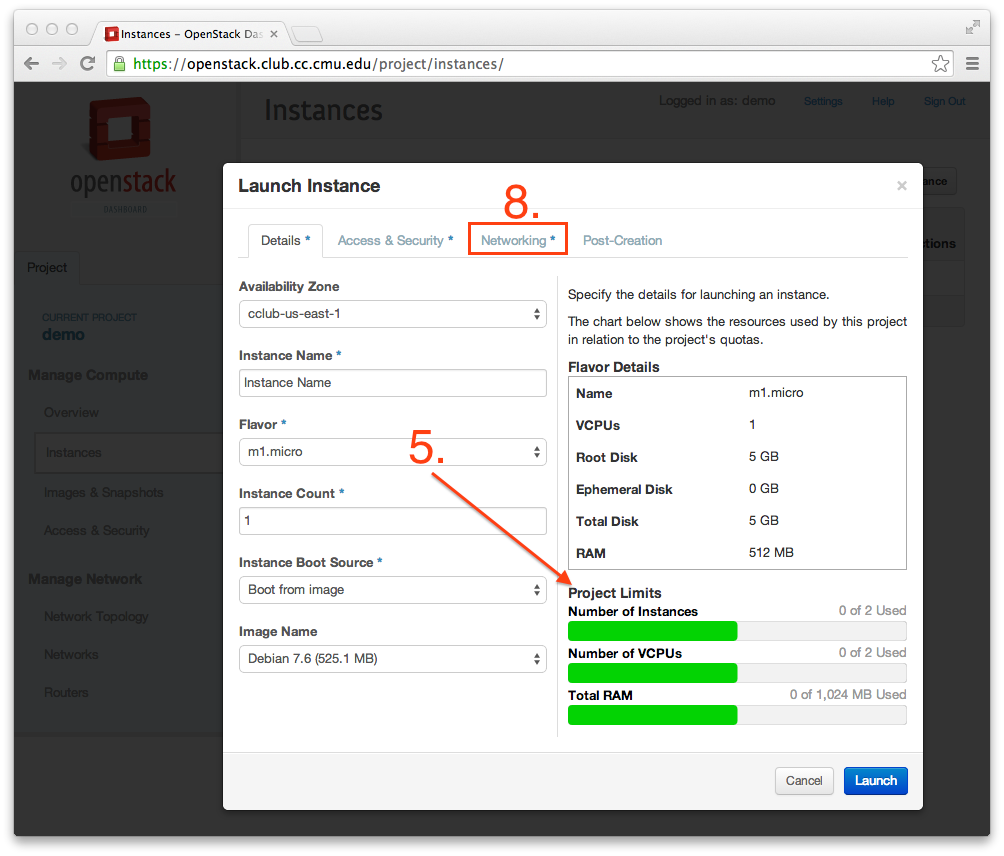
Click + Launch Instance to bring up the instance configuration dialog, see Figure 1
Make sure that the Availability Zone is cclub-east-1
- Type your instance name, and make sure it's correct; your VM's hostname will be set to this.
- Choose your instance flavor. The bars on the right side will show you how close you are to your max quota
In the Instance Boot Source menu, choose Boot from image
In the Image Name menu, choose Debian 7
Click on the top Networking * Tab
Click the blue + or Drag ccvm-net into the blue zone
Follow Projects/ccvms#Option 2: Define a root password (for people without floating IP quota). to make sure you'll have access to your VM.
- Click Launch.
Then, follow Projects/ccvms#Port Forwarding to get remote access to your VM.
Getting access to your instance
For access to your instance after creation, you must add specific config option when the instance in the "Launch Instance" popup.
Add the following:
#cloud-config
password: whateveryouwant
After your instance is launched, you will be able to open the instance console from the "More" menu, and log in to the default account using that password and the username specified below.
Image |
Username |
Fedora |
fedora |
Ubuntu |
ubuntu |
Debian |
debian |
Automatic ssh keypair authorization (for people with floating IP quota).
In the "Access & Security" tab, select a key to authorize. If you have not added any of your public keys to OpenStack, you can add one by pressing the + next to the dropdown.
After your instance is launched, you will be able to SSH to the default account (username specified above), or the root account, with standard private/public key ssh authentication.
Note: Your instance must have a publicly accessible IP address for you to SSH to it; so, for this method to work, you must associate a floating IP to it and SSH to that IP. You will not be able to do this if you do not have any floating IP quota, and most people don't, so you may need to take Option 2.
Accessing the Log and Console
The Log and the Console allows you to see the detailed status of your instance and perform remote management.
Only when your instance has reached the Active state will the Log and Console will be available.
You can access the console from clicking the instance name in the instance page, and choosing the Log or Console Tab respectively.
Adding Firewall Exceptions
To allow services such as Web and Game servers on your instance to accept connection, you must add an additional rule to the instance firewall
You'll want to open only the ports that you need on the machines that need it, so here's how:
Suppose we are the user demo and want to open port 7777 for the game Terraria for the vm Host-1-Demo:
Click on Access & Security on the sidebar
On the page that is titled Security Group click + Create Security Group a popup should open
On the popup, type the name demo_terraria. It is important to put your name there to prevent conflicts
In the description, type Port 7777 for terraria
Click Create Security Group, you'll be directed back to the Security Group page
Find demo_terraria in the table and click Edit Rules
You'll be directed to a page titled Security Group Rules
Click + Add Rule a popup should open
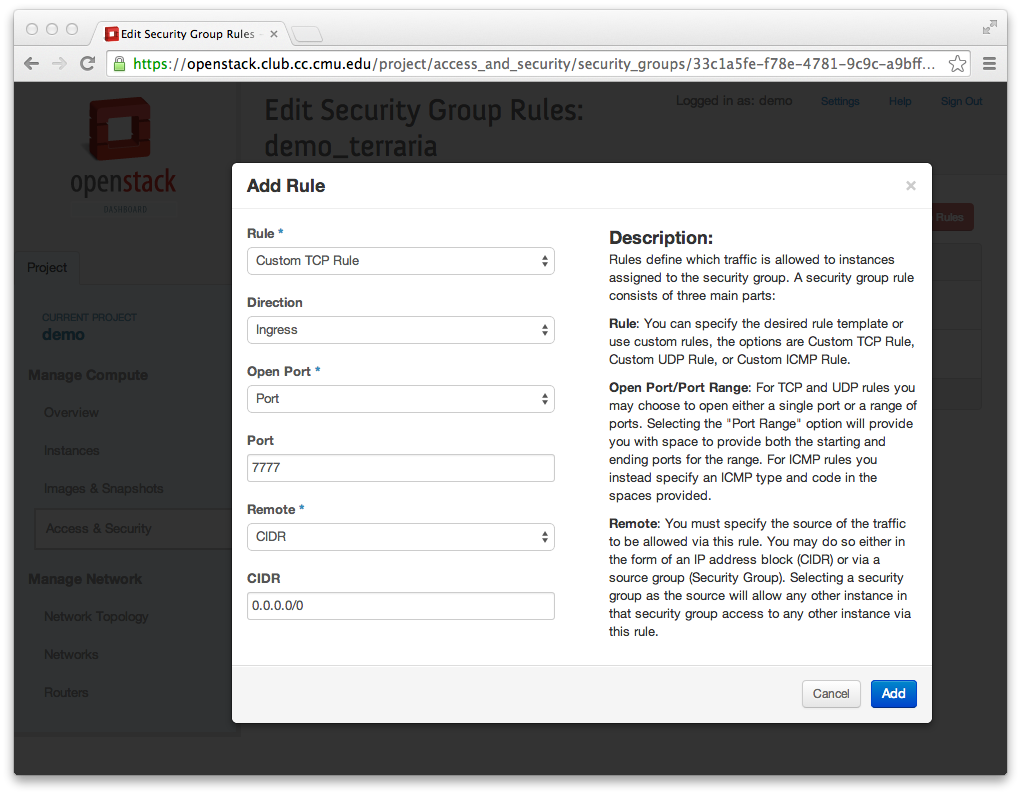
- You can add the specifics of your firewall exception here (See Figure 3)
In our case, we choose Custom TCP Rule as we don't see a premade rule from the list. If we wanted to open HTTP port, we could choose that premade rule from the list
Then we leave Ingress as it is as we need a rule to allow traffic to reach our VM
We choose Port as we only want to open one port. If we wanted to open a range, we could choose Port Range here
Enter 7777 in the port as that's the port we want
Then we leave CIDR selected as it is simpler
And We leave 0.0.0.0/0 as it is as we want everyone to be able to connect to our server
Click Add, You'll be directed back to the Security Group Rules page
- Verify that the new rule has been added in the table
We will now apply this group to a VM. Click Instance on the sidebar
Find your host, and in the last column, click More a dropdown should appear
Click Edit Security Groups A popup should appear
On the left, find your security group and click the blue + button
Click Save
Now that you have the security group, you could also apply this group when you create a new instance though the Access & Security tab
Port Forwarding
Unix machines reboot at 4am, Join Computer Club today to get access to unix machines that do not reboot
You can use ssh to port forward your server's port to one of andrew unix's machine. You can then connect to this port from anywhere in the world.
We'll use port 7777 on our vm Host-1-Demo and port 8888 and 8000 on unix1.andrew.cmu.edu. Note that because Andrew machines are a shared resource, the port you want may not be available. Simply pick a different port, and tell your client to use the alternate port.
Here's a quick diagram of how a packet will travel
(Internet) --> (unix1.andrew.cmu.edu listening on 8000) --> (unix1.andrew.cmu.edu listening on 8888 allowing only unix1) --> (Host-1-Demo listening on 7777)
On your instance's console, type:
   1 ssh -R 8888:localhost:7777 <YourAndrewID>@unix1.andrew.cmu.edu
   2 #<YourAndrewID>@unix1.andrew.cmu.edu password: <Your unix password>
   3
   4 # On unix1 console, (it can be the one you got from the above step)
   5
   6 ssh -L 0.0.0.0:8000:localhost:8888 localhost
   7 #<YourAndrewID>@localhost password: <Your unix password>
   8
Getting Access to CCVM
If you are a Computer Club member, see Projects/ccvms/Internal_Use.
Create a personal account
Go to https://openstack.club.cc.cmu.edu and click the Register link. After your account is created, you will be redirected to the login page.
Create an organization project
Organizations can contact operations@club.cc.cmu.edu to request an organization account with a higher instance and performance quota.
Organization related CCVM Tasks
Organizations can perform additional tasks in addition to the basic tasks
Switching to the Organization project
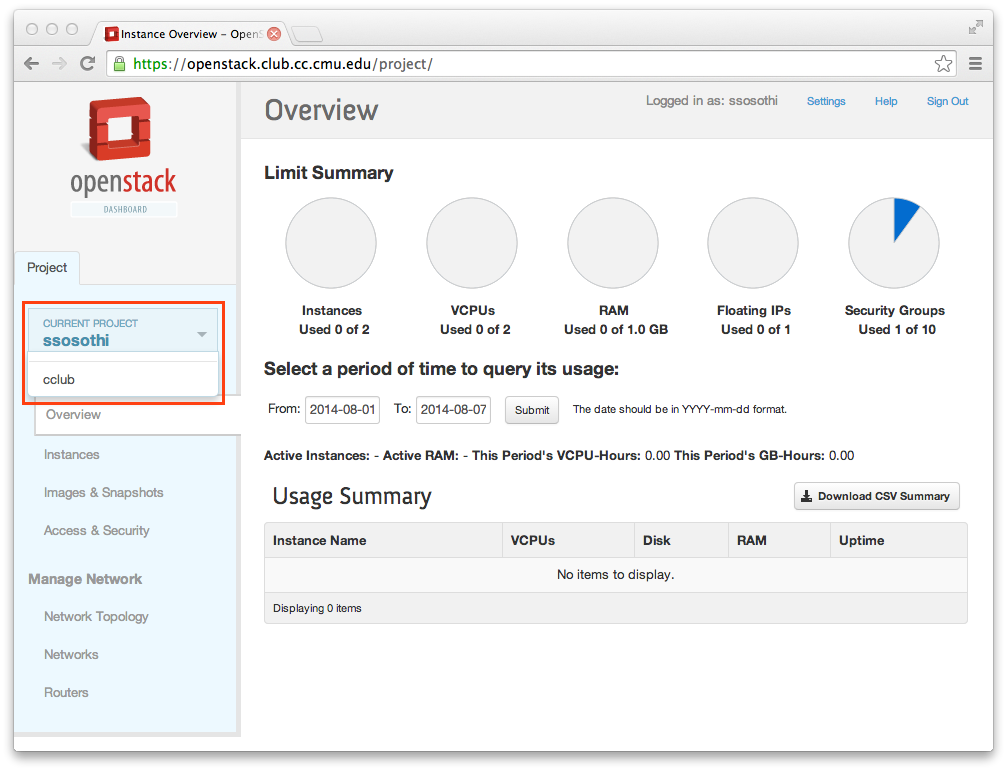
If you are a part of an organization, you can switch over to manage the organization's project. See Figure 4.
On the top of the blue section of the sidebar, where it says CURRENT PROJECT <Your name> You will now see a dropdown. By clicking on that dropdown, you'll see the organizations that you belong to, and can can switch to their VM group by clicking the organization name.
Note that every VM in the organization project group can be seen and fully edited by other members of your organization.
Allocating a public IP
The cluster only has 23 Public IP address, so please be considerate; even if you have quota, avoid using it if not necessary.
On the Instance page, on your instance, you can click More and click Associate Floating IP. In the popup you can click the grey + and then the blue Allocate IP. You'll receive an IP address from our pool, please note this IP address down. Then you can click the blue Associate button.
The new IP should start working right away, and will be displayed on your instance screen after a couple of minutes.
Allocations
Once you've created an CCVM OpenStack account, you'll be given the community level of CPU, RAM, and VM allocation. As we move on with this project, we may be able to increase your allocation as demand increases and we acquire more hardware.
We can also increase allocations for anyone who contacts us and can justify their usage. Please contact operations@club.cc.cmu.edu with your request.
Our standard VM Flavors are as follows:
Flavor Name |
VCPUs |
RAM |
Root Disk |
m1.micro |
1 |
512MB |
5GB |
m1.tiny |
1 |
1024MB |
10GB |
m1.small |
2 |
512MB |
10GB |
m1.medium |
2 |
1024MB |
15GB |
m1.large |
4 |
2048MB |
20GB |
Community Account
2 Instances, 2 VCPU, 1 GB Ram
Flavors available:
- m1.micro
- m1.tiny
- m1.small
Organization Account
Organizational limits are flexible and we can adjust the limits depending on your requirements


